Apitor Robot Edukacyjny
Rozdział 1 Wstęp
Zestaw klocków przeznaczony jest dla dzieci od 8 lat. Ale czy tylko dla nich? A może i dla kompletnego laika po czterdziestce? Zapewniam, że nie ma lepszej nauki programowania. Bo widzisz konkretny efekt konkretnych instrukcji. Od startu samochodziku do bardziej skomplikowanych algorytmów. Polecana jest jednak pomoc osoby dorosłej. Zwłaszcza gdy Szanowny Czytelnik jest w przedziale 8-12 lat. Nie dotyczy to samej budowy różnych konstrukcji z klocków. W tym może być on lepszy od Ciebie!
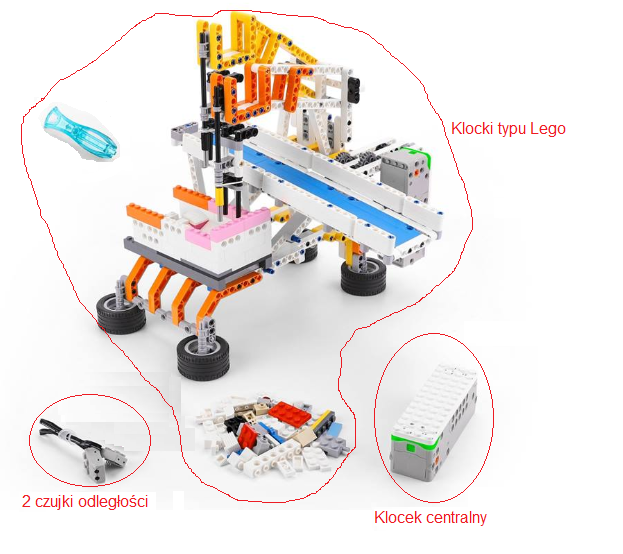
Właściwie to tytułem powinno być Apitor SuperBot, bo tak nazywa się robot edukacyjny. Gdzie i jak go kupić za kilkaset złotych to dowiesz się w internecie. Jest to zestaw klocków podobnych do Lego. Najważniejszym klockiem jest komputer wraz z przyległościami takim jak jednostka komunikacyjna Bluetooth, 4 porty i 2 silniczki. Nazwijmy go górnolotnie Klockiem Centralnym. Zestaw zawiera też 2 czujki odległości i można je podłączyć do tych portów. Cała reszta to klocki typu Lego. Z tego wszystkiego można budować różne urządzenia i ograniczeniem jest tylko wyobraźnia. A gdy i jej braknie, to Instrukcja robota pomoże zmontować 18 różnych konstrukcji.
Rys. 1-1
Zestaw Apitor SuperBot
Rys. 1-2
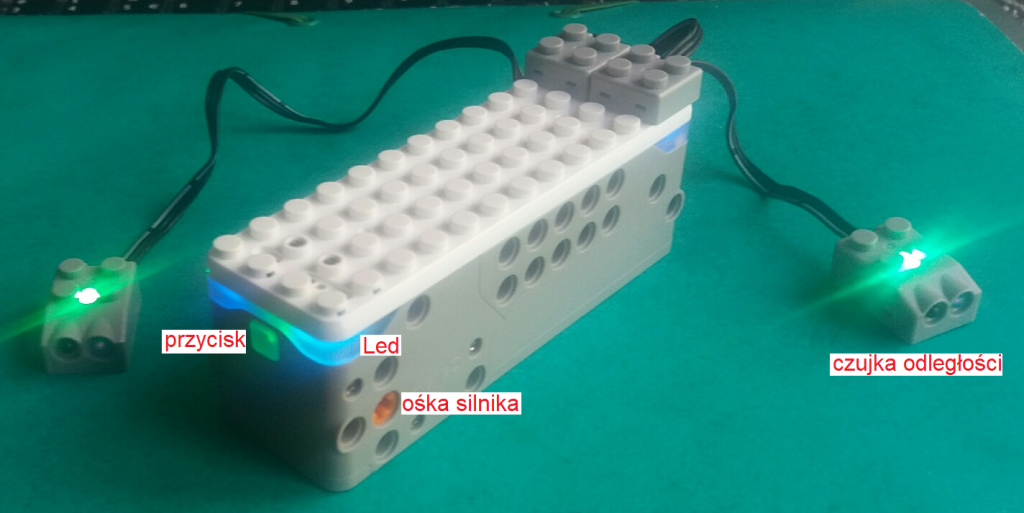
Klocek Centralny z podłączonymi 2 czujkami odległości
Wyposażenie
– Komputer wewnątrz
– Jednostka Komunikacji Bluetooth wewnątrz
– 2 silniczki.Tu widoczna ośka jednego, ośka drugiego z przeciwnej strony. Do nich można przymocowywać różne elementy np. kółka.
– 4 Ledy Tu widoczne 2 z przodu i 1 z tyłu
– 4 porty do których można podłączać inne elementy-tu 2 czujki odległości
– Przycisk włączający
Klocek Centralny jest programowany i sterowany przy pomocy komórki lub tableta. W dalszym opisie używam słowa komórka, które można zastąpić słowem tablet. Komórka powinna być typu iphone lub smartfon z Androidem. Niestety zwykłe komputery stacjonarne! i laptopy wykluczone!
A może to zaleta?