Apitor Educational Robot
Chapter 4 Tutorial Screen
Chapter 4.1 Introduction
We will enter the window by clicking the “Tutorial” button. Here you will learn how to program the Robot the fastest. This is basically an introduction to programming. The programs are very short, but you will already see the effects. This can provide some satisfaction!
Remember that the cell phone and the Main Central Unit must have Bluetooth enabled, even if the program does not apply to the Main Central Unit!
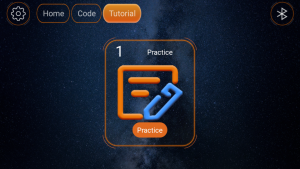
Fig 4-1
Click button “Practice”
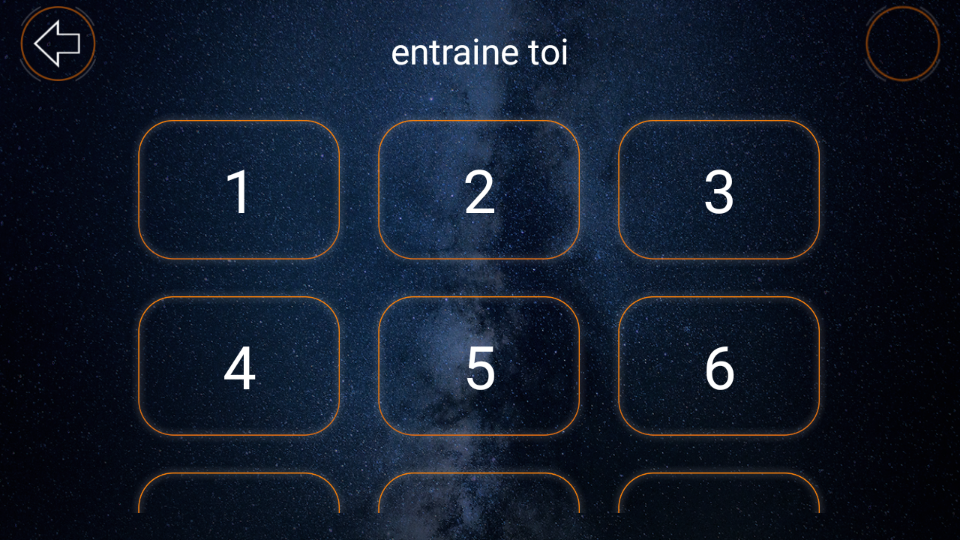
Fig. 4-2
A window will open with 15 buttons for 15 exercises.
When you start learning, you can only enter exercise no. 1. The remaining buttons are locked. When exercise no. 1 is successful, exercise no. 2 will be unlocked, etc. In Fig. 4-2, all buttons are unlocked because I have done all the exercises.
A few words about the exercises themselves.
Each consists of 2 parts:
First part
This is just a demonstration of the program itself, in which individual instructions look like Lego bricks. You can’t change anything.
Your role is only to remember the program as a sequence of instructions.
Second part
The goal is to recreate the program from the first part.
You can recall the program at any time by clicking the “Hint” button -> Fig. 4-4. The second part may be in an easier or more difficult version.
Easier version
You have instructions laid out in random order on the screen. Your job is just to put them in the right order and test the program. Sometimes you need to enter a parameter into an instruction. For example, the type of sound or the sensitivity of the distance sensor.
More difficult version
The only difference is that at first you see a blank screen.
You download the instructions needed for the program from the instruction panel.–> See Fig. 4-4.
Now go to exercise no. 1 by clicking button no. 1.
Chapter 4.2 Exercise No. 1

Fig. 4-3
The first part of exercise no. 1
The simplest possible program will appear and try to remember it.
On the left is its description “Mission-Play short sound effect ‘sound9′”.
Go to the second part by clicking on the cross in the upper left corner.

Fig.4-4
Second part of exercise No. 1 – Two separate instructions on the screen.
Your goal is to recreate the program from the previous window. And if you forget it, you can click the “Suggest” button at any time. All the necessary instructions are on the screen. That is, the green “Start” instruction and the black “Sound” instruction with the “sound9” window. You must connect them in the correct order, i.e. as in Fig.4-3.
The individual instructions are like “magnetized” Lego bricks. Swipe the “Sound” instruction with your finger on the screen and place it under the green “Start” instruction. You don’t have to be super precise, because the instructions will snap into place when they’re nearby. You’ll hear a clicking sound. Note that it’s impossible to position subsequent instructions incorrectly! This is the advantage of this graphical programming method over simply writing subsequent instructions.
Note
Sometimes the fingers are too big. Then use the “Center”, “Enlarge” and “Reduce” keys to change the position and size of the instructions.
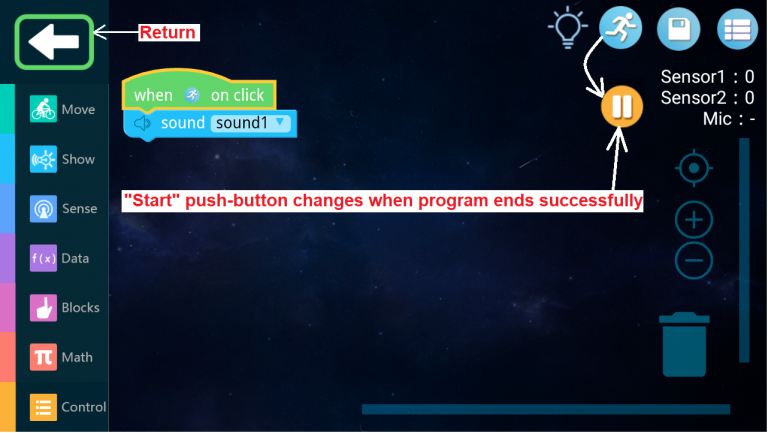
Fig.4-5
Second part of exercise No. 1 – Combined instructions.
That is, the right program. We can start testing it.
Click the “Start” button
You will hear a short sound and the “Start” button icon will change. The program was a success.
So what, that’s it? Yes. The program was simple, short and you probably won’t get the Nobel Prize.
Now something about the instructions themselves.
Every program consists of instructions. The first instruction is always the “Start”. How does the “Start” instruction differ from the “Start” key? Well, the “Start” instruction constantly checks the state of the “Start” key. This key is most often waiting for a click and its icon is a “blue runner”. When clicked, we say that the key icon is enabled. If this happened, we move on to the next instruction. This next intruction oon Fig. 4-5 is a green lego brick “when (runner) on click”. In our case, the next instruction is the release of a short sound by the cell phone. This is the last instruction and the program will stop. We will recognize this when the “Start” key icon changes from a blue runner to a brick symbol ||. This was an example in which the main central unit “does nothing”, but it still has to be connected via Bluetooth to the cell phone. This is also the case in exercises no. 2…11.
Time for exercise no 2.
Click the “Return” button.
A window with exercise keys will open –> Fig. 4-2.
Key no 2 should be unlocked as exercise no 1 was successful. Click it.
Chapter 4.3 Exercise No. 2
First part

Fig.4-6
The program differs from lesson No. 1 only in the type of sound. Go to the second part of the lesson by clicking the upper coss.
Second Part
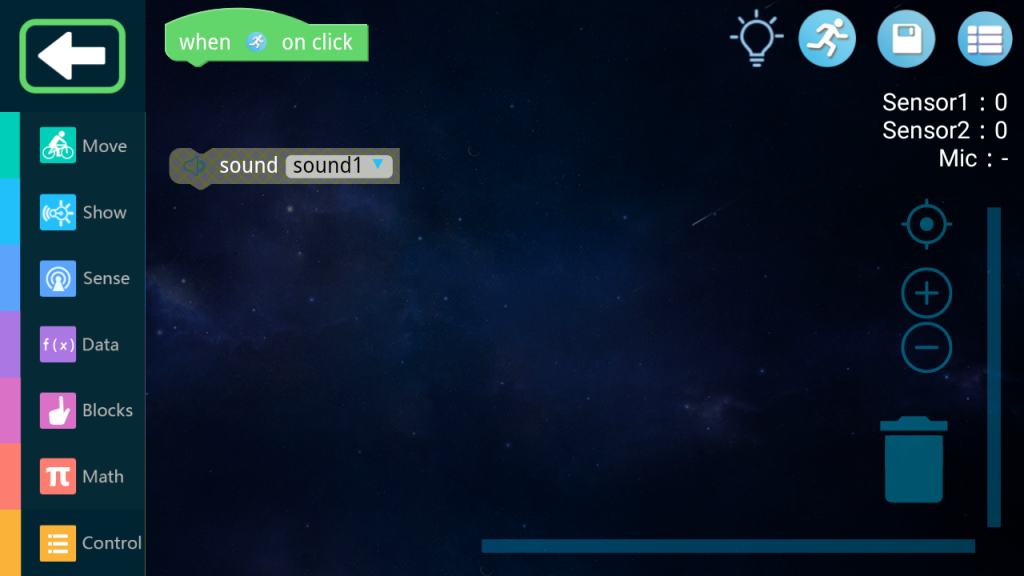
Fig. 4-7
Change the sound type to sound9 and move the lower instruction up
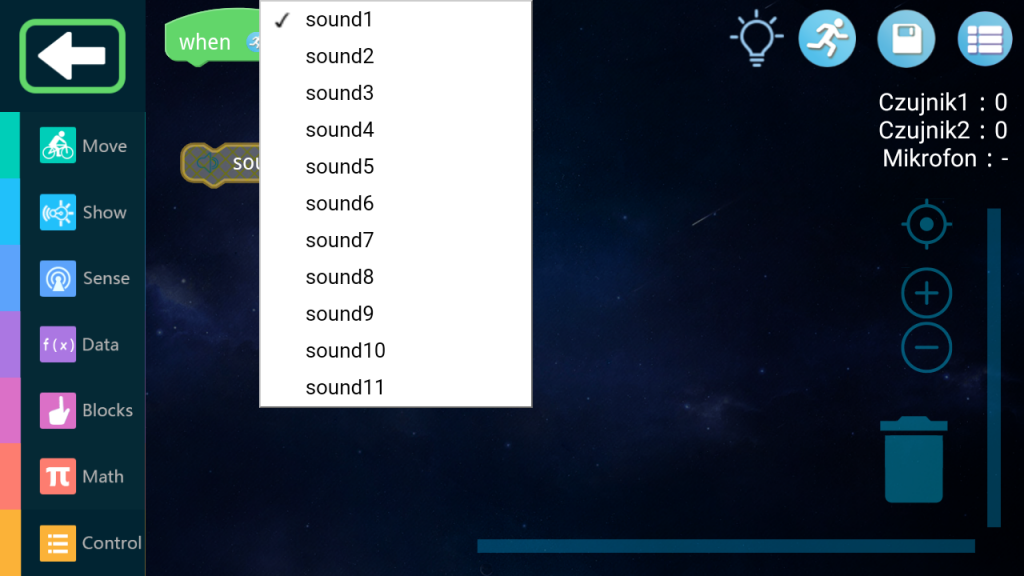
Fig. 4-8
But first, center the image by clicking the “Center” button (Fig. 4-4) and enlarge it by clicking the “Enlarge” button (Fig 4-4).
Then click on the sound1 parameter in the sound statement and select sound9. Now you can combine both instructions.
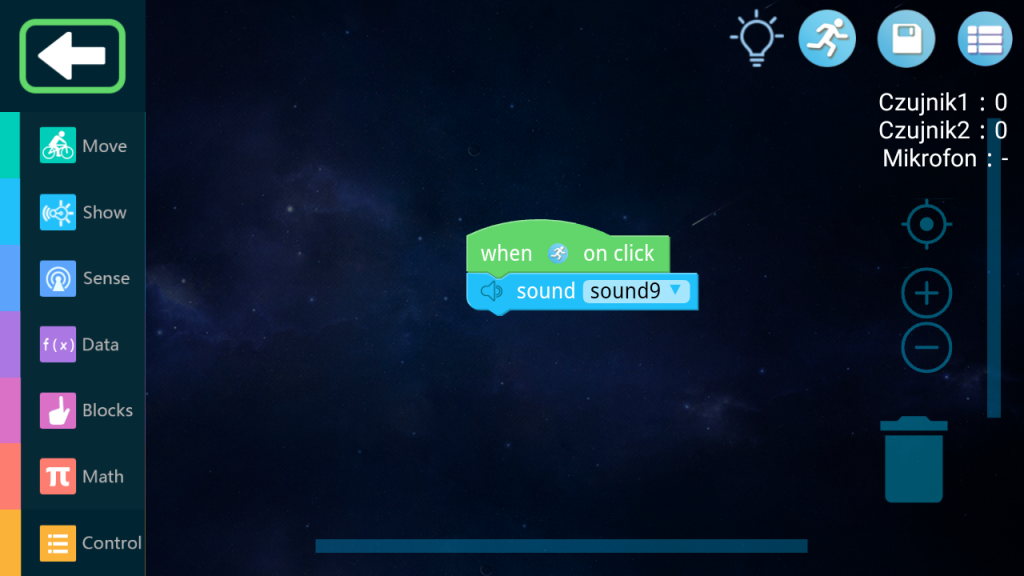
Fig. 4-9
Click the “Start” button
You will hear a loud “Wow“, i.e. sound9. The “Start” key will change from a blue runner to a brick || because the program has reached the end. If you want to run the program again, click brick ||. This symbol will change back to a blue runner. Click it. You’ll hear “Wow” again.
Now go to exercise no 3. You know how to do it.
Chapter 4.4 Exercise No. 3
You already know how to navigate the program, so the further description will be less detailed.
First part
The program is similar to the previous ones
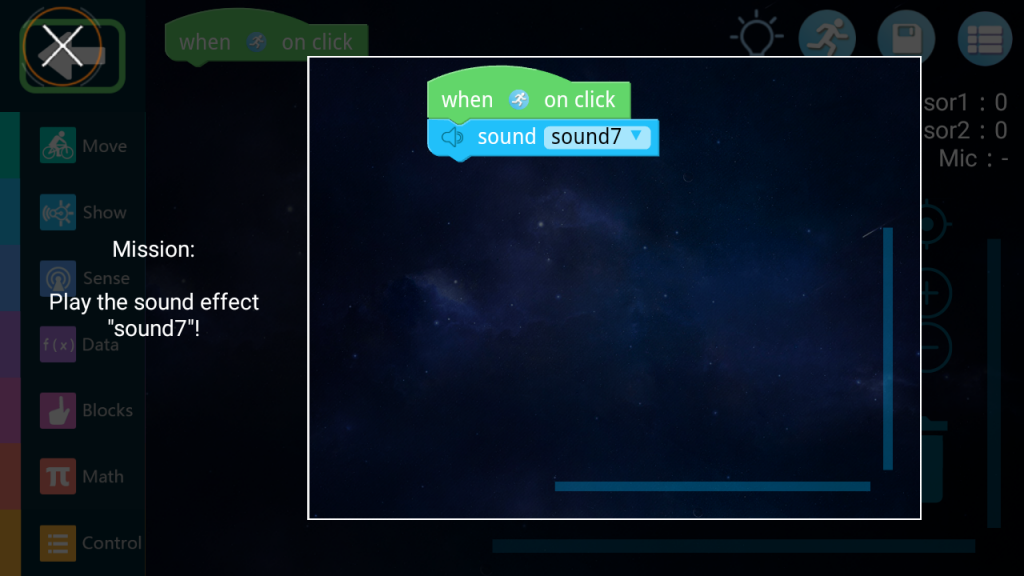
Fig.4-10
Click cross.
Second part
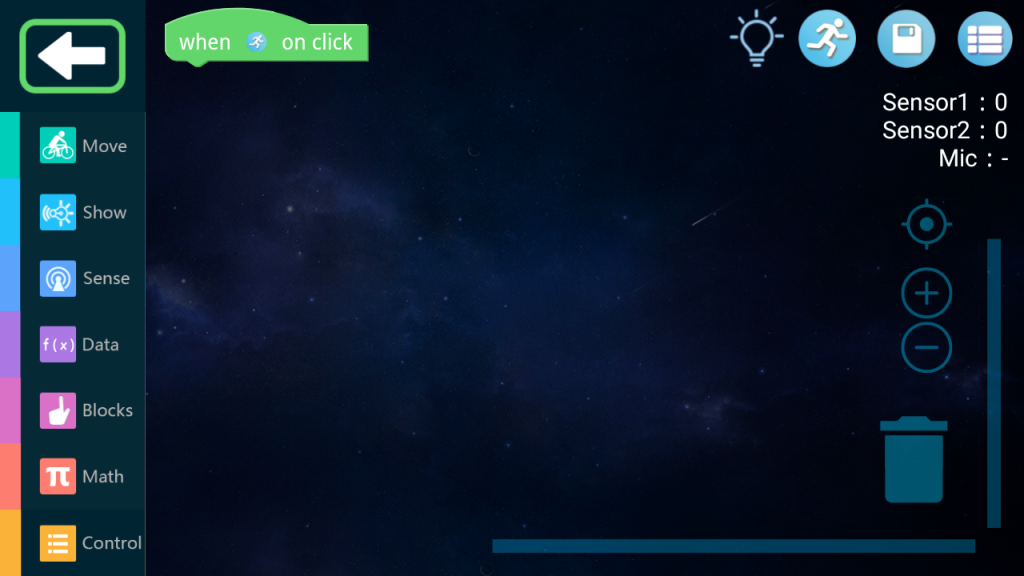
Fig.4-11
Surprise. You only see the “Start” instruction. Where are the rest of the instructions?
We are dealing with a more difficult version of the program–>see Introduction.
All instructions are hidden and placed in appropriate groups in the instructions panel (Fig. 4-4). By clicking on each group you will see them.
For your convenience, let me tell you that the sound instruction is hidden in the Show group. Click on it.
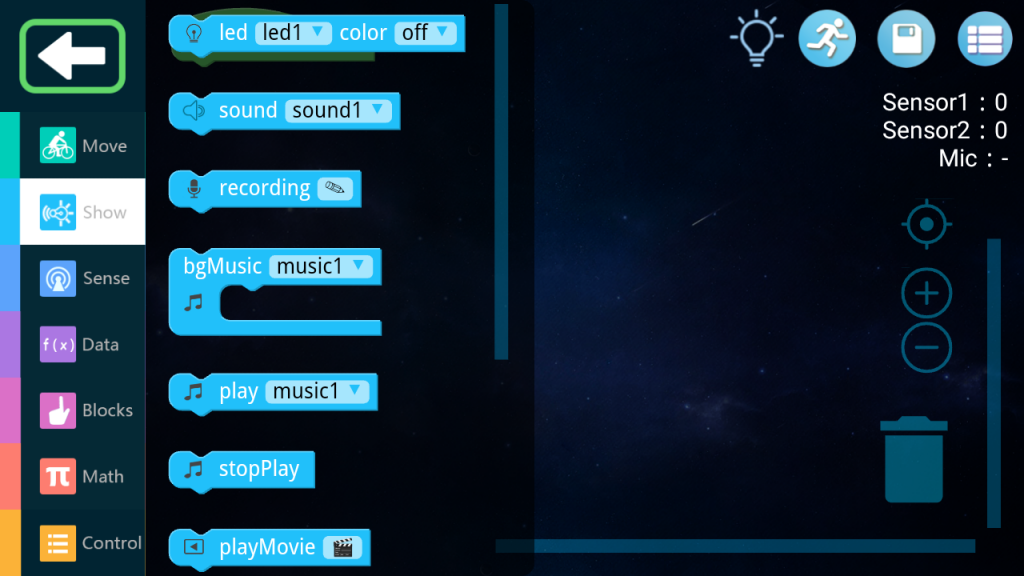
Fig.4-12
Download the audio manual by clicking
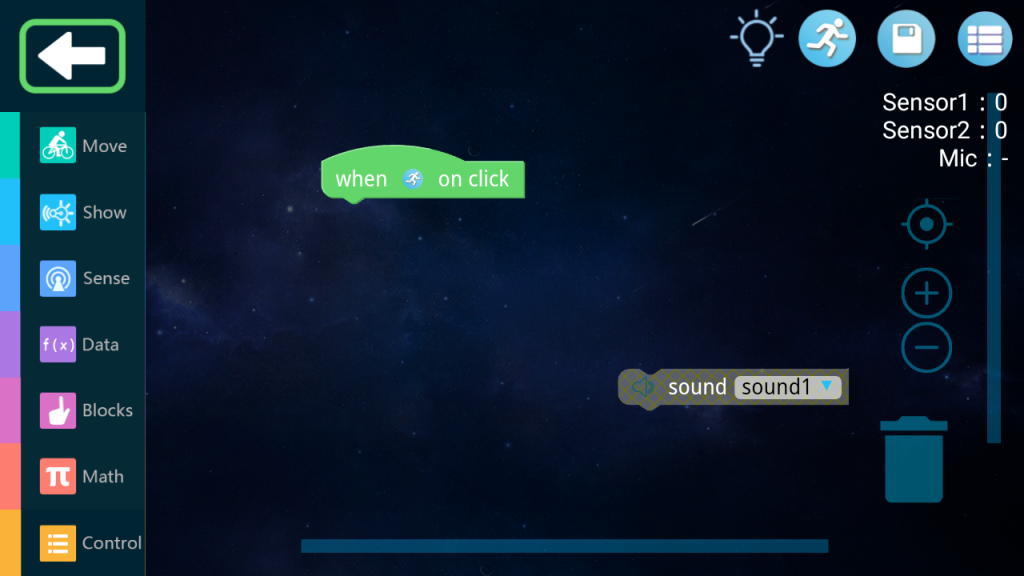
Fig.4-13
And then change the sound type from sound1 to sound7. You know what to do next and finish the lesson yourself.
Chapter 4.5 Exercise no. 4
You will impress the audience when you program your robot this way.
– The robot is coming
– Detects the wall with a distance sensor
– Stops
– He says “Wall, oh my god, I have to go back!” – He could say otherwise, but this is a cultured robot.
– It turns
– He’s coming back
For this you need the ability to audio record and that is what this exercise is about..
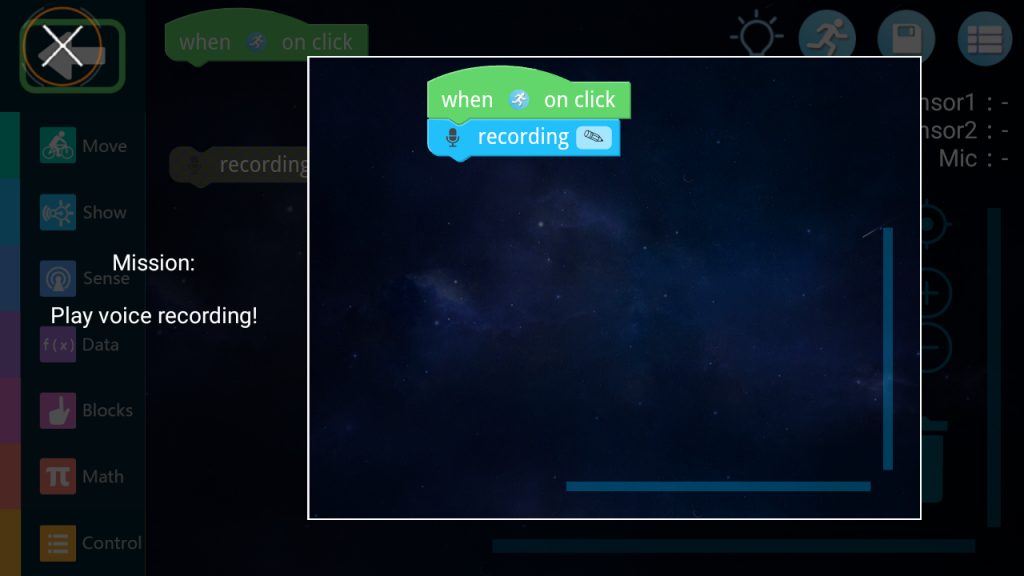
Fig.4-14
As usual, save this program and click on the cross
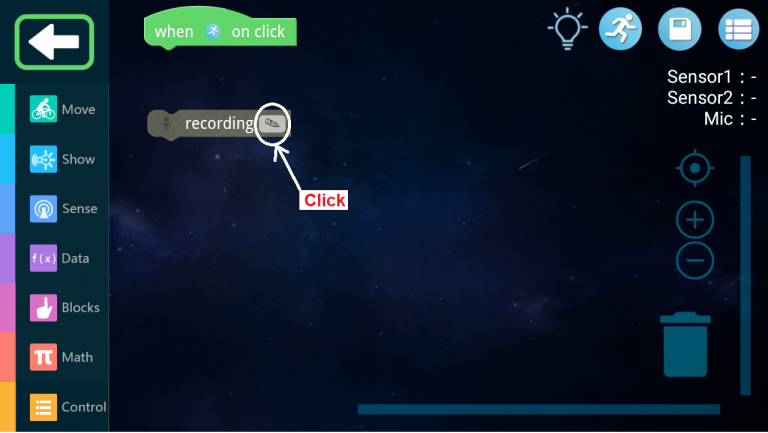
Fig.4-15
The screen can be clicked, centered and enlarged
To turn on the tape recorder, click
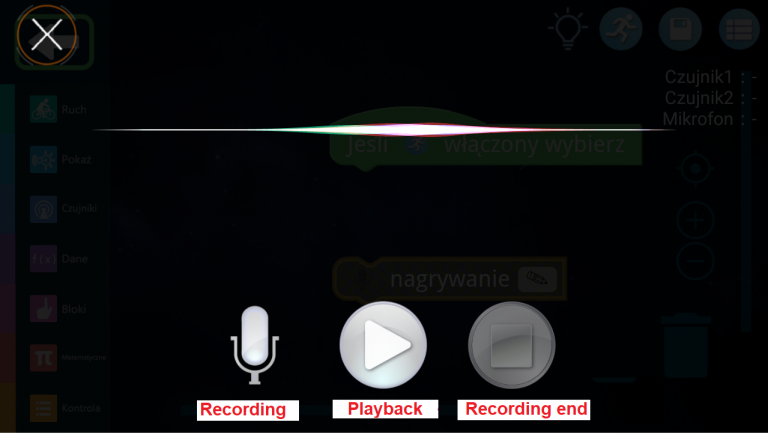
Fig.4-16
You have 3 tape recorder buttons at your disposal, the names of which speak for themselves.
Record, for example, “Alice has a cat” and check the recording by pressing the Play button.
Click on the cross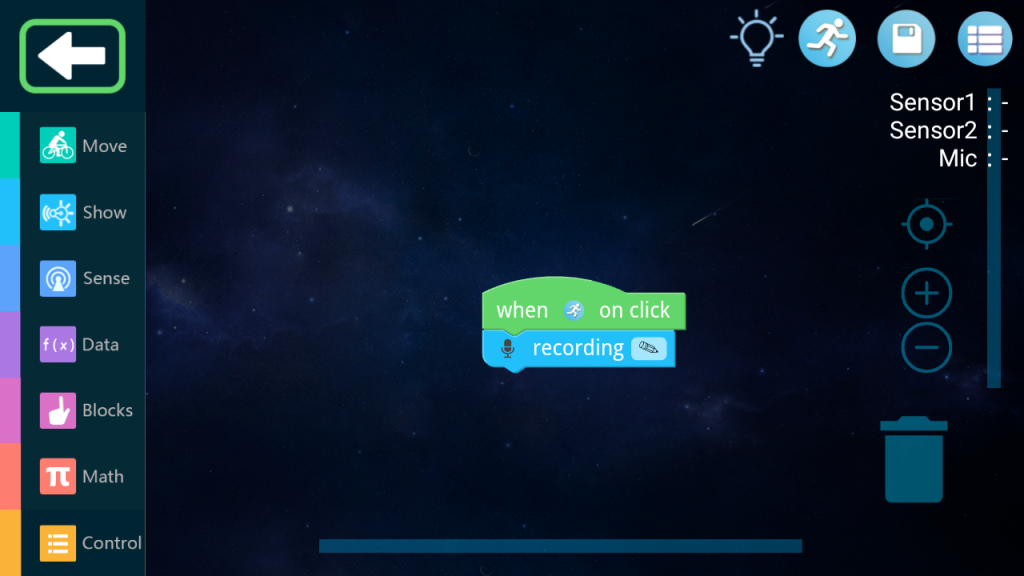
Fig.4-17
Click the “Start” button. You will hear “Alice has a cat”
Chapter 4.6 Exercises 5,6 and 7
Nothing new and you’ll be fine.
Chapter 4.7 Exercise No. 8
Programs couldn’t be simpler before. Only 2 instructions. Now there will be 4 of them! The Nobel Prize is already waiting!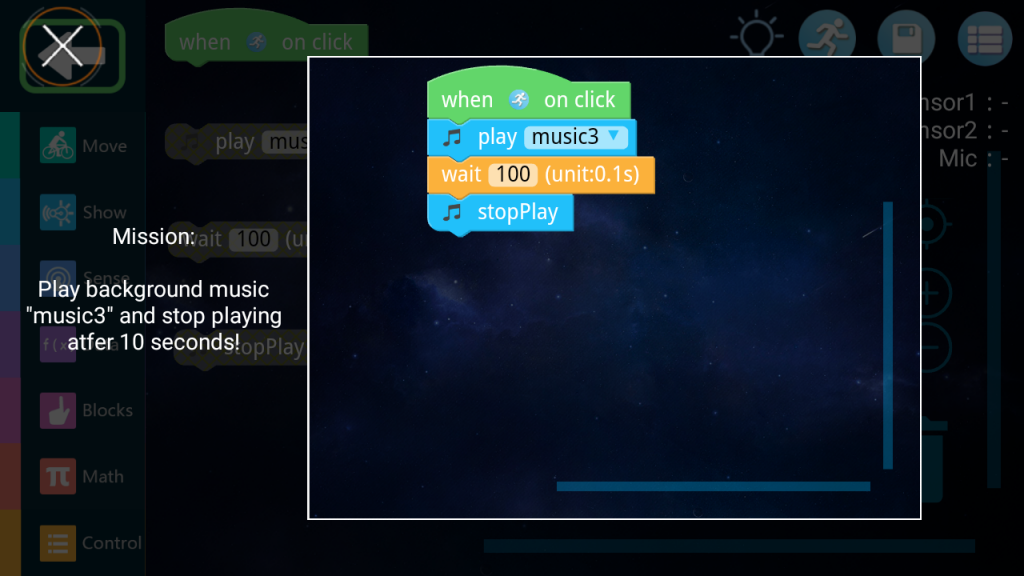
Fig.4-18
Save the program.
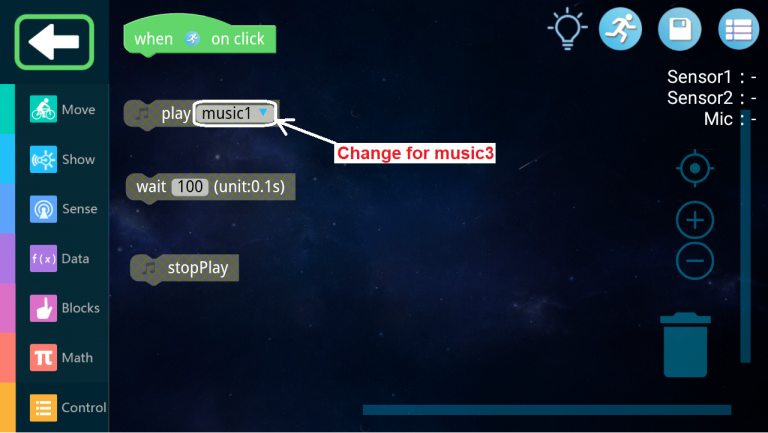
Fig.4-19
Change to music3 and arrange the program.
Fig.4-20
Click the “Start” button. You will hear a melody lasting 10 seconds
Chapter 4.8 Exercises 9,10 and 11
There is nothing new here and make them yourself.
Chapter 4.9 No. Exercises 12 and 13
For the first time, the Main Central Unit takes part in the action. I recommend adding circles for better visual effects.
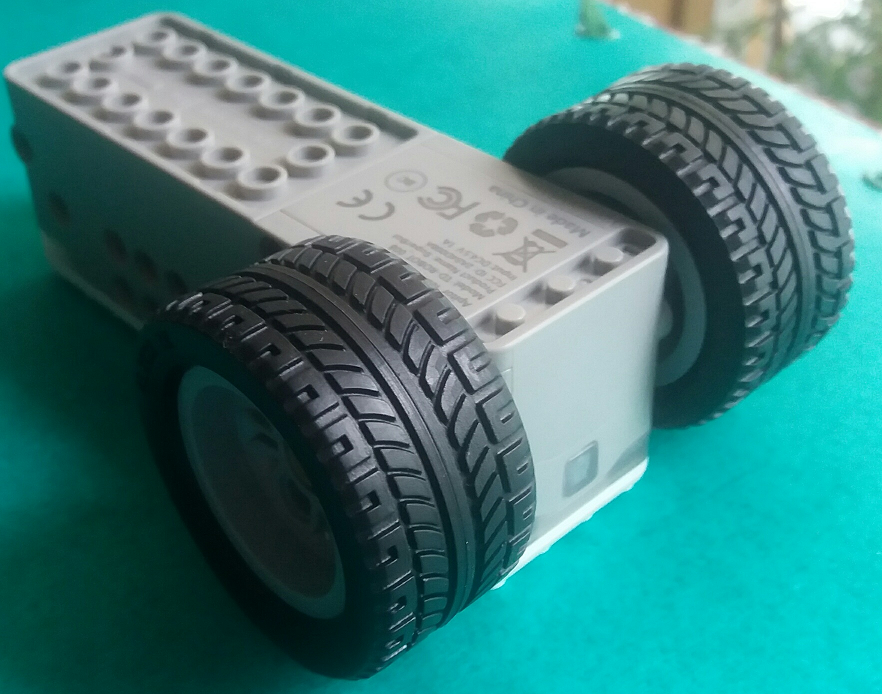
Fig. 4-21
Main Central Unit with wheels.
Now you can go to exercise no 12.
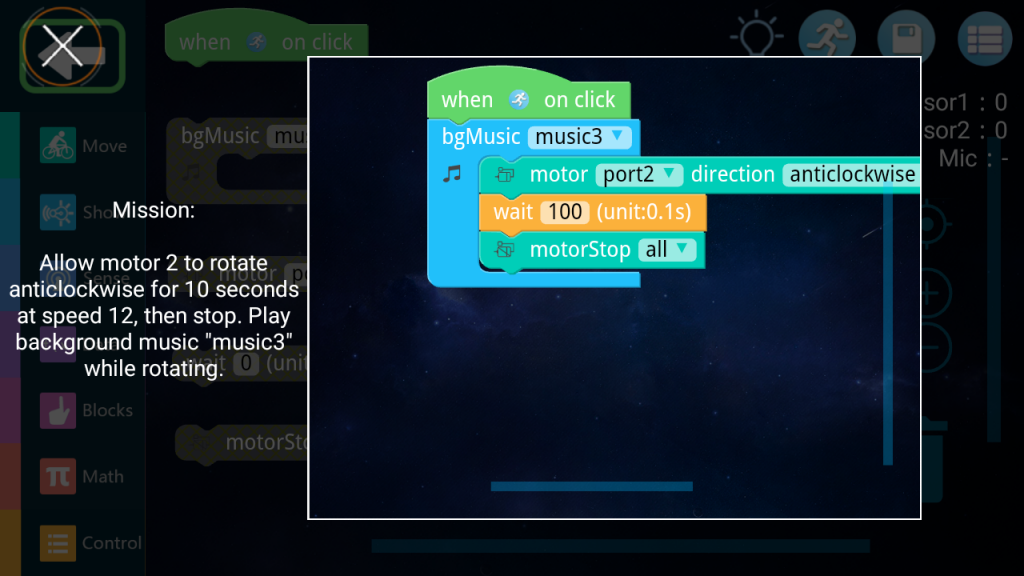
Fig. 4-22
Save the program and click the cross
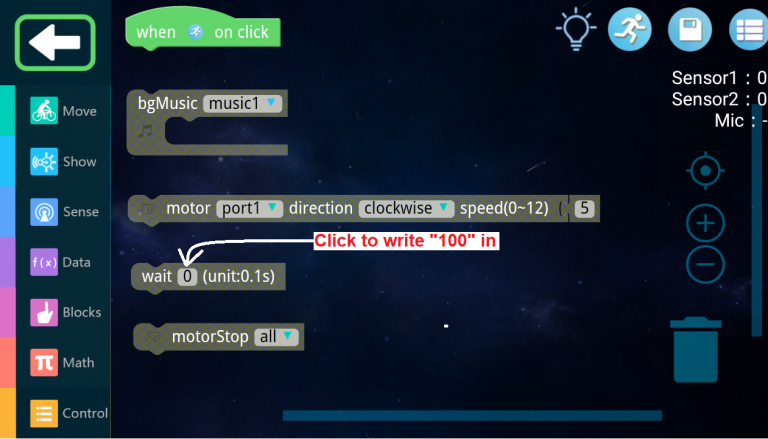
Fig. 4-23
What’s new is entering the number 100 in the WAIT instruction. Click the box with 0.
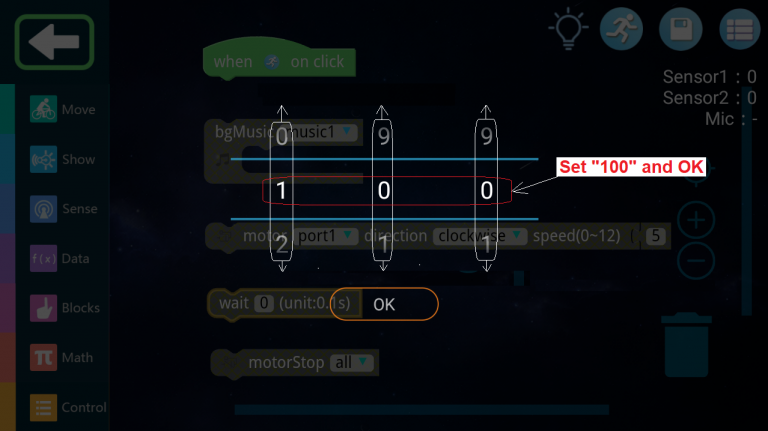
Fig. 4-24
Entering a number into the WAIT instruction is associated with one-armed bandit spins.
You also enter numbers in other instructions this way.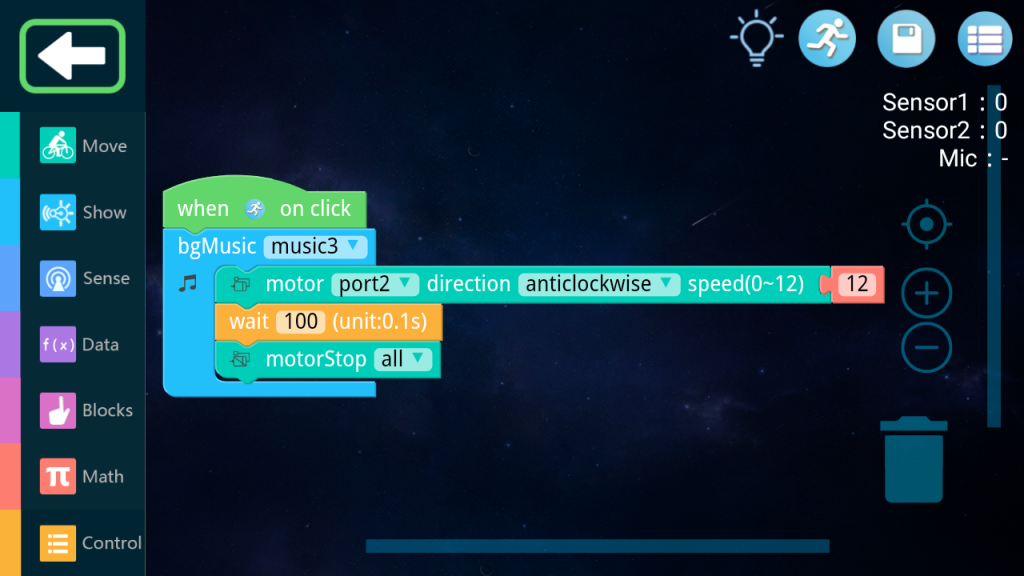
Fig. 4-25
Click the Start button
The program in which
– music plays
– one wheel of the robot is spinning
– after 10 seconds the party is over
Exercise No. 14 is a more difficult version (with an instruction panel) and do it yourself.
Chapter 4.9 Exercises No. 14 and 15
Say loudly–>Go car–>the car will start
You stop talking–>the car is parked
Nay. The louder you speak, the faster the car goes.
You don’t have to build an entire car with bells and whistles. All we need is the crippled car from Fig. 4-21.
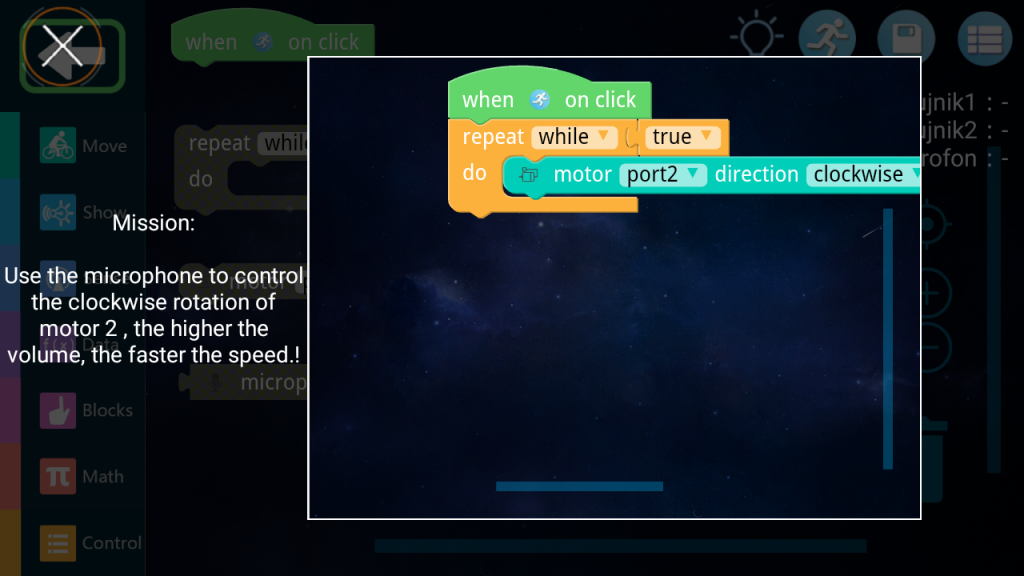
Fig. 4-26
Save the program.
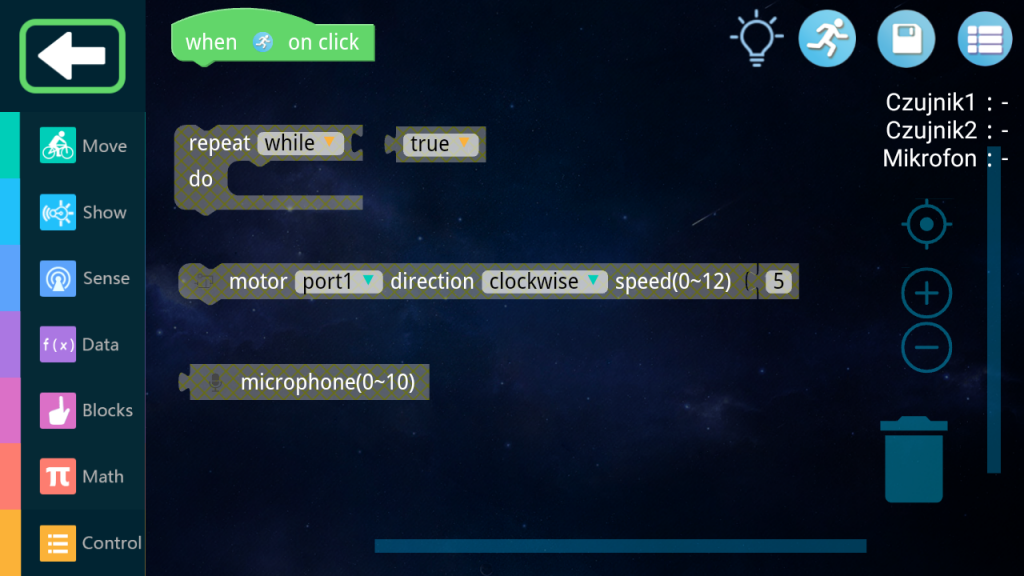
Fig. 4-27
Build a program from these instructions.
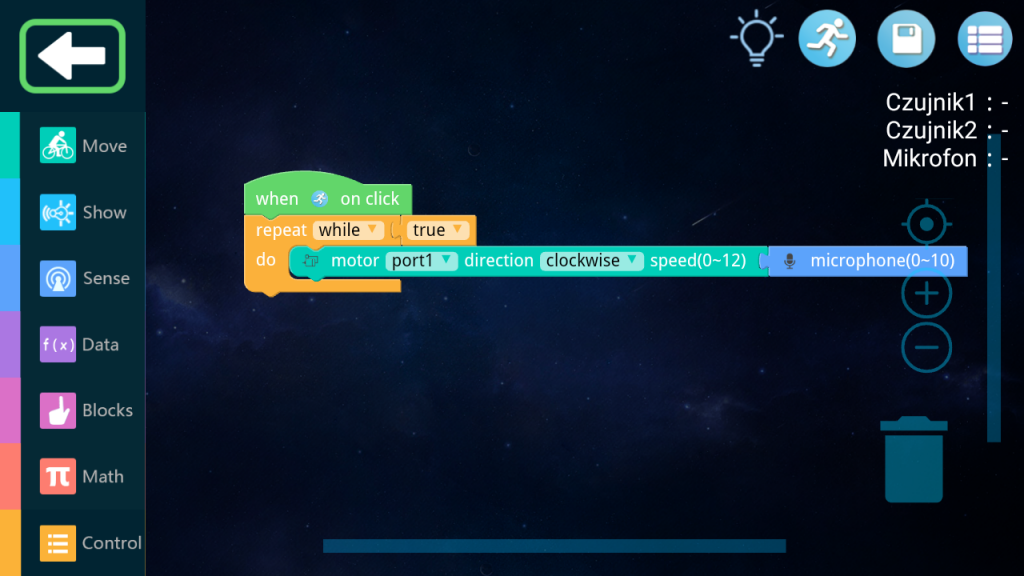
Fig. 4-28
Check the program by clicking on the runner.
When you speak louder, the wheel spins faster. When there is silence, the car stops.
.